WordPressでユーザー毎に設定する権限グループについて調べる機会があったのでメモ。
権限グループ
WordPressでは以下の6つの権限グループが用意されています。
- 特権管理者
- 管理者
- 編集者
- 投稿者
- 寄稿者
- 購読者
特権管理者
特権管理者はマルチサイトでのみ利用できる権限で、複数サイトにわたるすべての権限を持つロールになります。
マルチサイト限定の権限で使用機会もあまりないので、以降の説明からは割愛します。
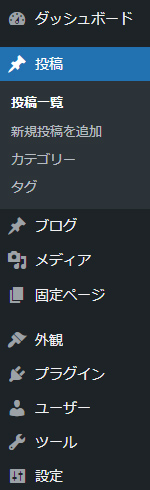
管理者(administrator)
サイト内のすべての権限を持つロールです。
WordPressのインストール時に追加されるユーザーはこのロールになります。
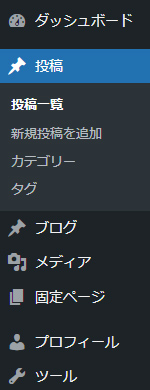
編集者(editor)
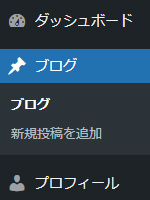
他ユーザーの作成したコンテンツを含む、すべてのコンテンツを管理する権限を持つロールです。
コンテンツ管理に関連する投稿(固定ページ含む)やメディア(ファイルのアップロード)の権限を持っていますが、テーマやプラグイン、ユーザー管理、設定などサイトに関連する権限はありません。
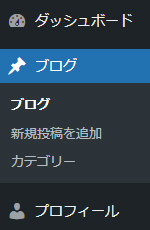
補足:カスタム投稿について
上記画像の「ブログ」はカスタム投稿での作成になりますが、カスタム投稿への権限はカスタム投稿の設定によって異なる点注意が必要です。
例えば上記のブログの場合、functions.phpで以下のように設定しています。
function create_posttype() {
  register_post_type('blog',
    array(
      'label'           => 'ブログ',
      'public'          => true,
      'menu_position'   => 5,
      'hierarchical'    => false,
      'show_in_rest'    => true,
      'has_archive'     => true,
      'rewrite'         => array(
        'slug'          => 'blog',
        'with_front'    => false
      ),
      'query_var'       => false,
    )
  );
}
add_action('init', 'create_posttype');
設定でcapability_typeとmap_meta_capを追加して、カスタム投稿独自の権限を設定します。
function create_posttype() {
  register_post_type('blog',
    array(
      'label'           => 'ブログ',
      'public'          => true,
      'menu_position'   => 5,
      'hierarchical'    => false,
      'show_in_rest'    => true,
      'capability_type' => array(
        'blog', 'blogs'
      ),
      'map_meta_cap'    => true,
      'has_archive'     => true,
      'rewrite'         => array(
        'slug'          => 'blog',
        'with_front'    => false
      ),
      'query_var'       => false,
    )
  );
}
add_action('init', 'create_posttype');
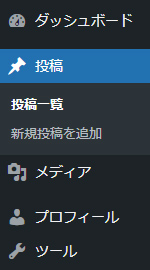
これで元々の権限がデフォルトの投稿と同じになっていたのに対して、上記の変更によって権限が別になった(権限グループがカスタム投稿の権限を持たなくなった)ため、サイドバーに表示されなくなりました。
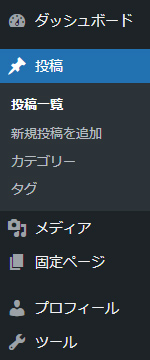
投稿者(author)
自分の作成した記事を公開・管理できる権限を持つロールです。
自分の作成した記事とメディア(ファイルのアップロード)の権限を持っていますが、カテゴリ管理や固定ページに関する権限はありません。

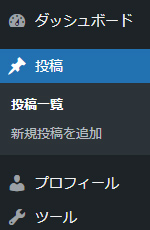
寄稿者(contributor)
記事を作成する権限のみ持っているロールです。
記事作成の権限は持っていますが、メディア(ファイルのアップロード)や公開後の編集などの権限はありません。
公開・管理する権限を持っていないため、作成した記事は管理者か編集者が公開する必要があります。
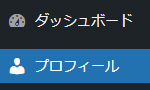
購読者(subscriber)
記事を閲覧する権限のみ持っているロールです。
自分のプロフィールの編集と、記事の閲覧のみ行えます。

各権限グループの比較
以下は各権限グループで実行できる内容の一部をまとめた表で、管=管理者、編=編集者、投=投稿者、寄=寄稿者、購=購読者 となっています。
詳しくは公式ドキュメント内の表をご確認ください。
| 権限内容 | 管 | 編 | 投 | 寄 | 購 |
|---|---|---|---|---|---|
| ユーザーの作成 create_users |
○ | ||||
| ユーザーの削除 delete_users |
○ | ||||
| プラグインの編集 edit_plugins |
>○ | ||||
| テーマの編集 edit_themes |
○ | ||||
| コメント管理 moderate_comments |
○ | ○ | |||
| カテゴリ管理 manage_categories |
○ | ○ | |||
| 他人の記事を編集 edit_others_posts |
○ | ○ | |||
| 他人の記事を削除 delete_others_posts |
|||||
| 固定ページの公開 publish_pages |
○ | ○ | |||
| 固定ページの編集 edit_pages |
○ | ○ | |||
| 固定ページの削除 delete_pages |
○ | ○ | |||
| ファイルのアップロード upload_files |
○ | ○ | ○ | ||
| 記事の公開 publish_posts |
○ | ○ | ○ | ||
| 公開記事の編集 edit_published_posts |
○ | ○ | ○ | ||
| 公開記事の削除 delete_published_posts |
○ | ○ | ○ | ||
| 記事の編集 edit_posts |
○ | ○ | ○ | ○ | |
| 記事の削除 delete_posts |
○ | ○ | ○ | ○ | |
| 記事の閲覧 read |
○ | ○ | ○ | ○ | ○ |
権限グループの追加
独自の権限グループを追加する場合、add_role()を使用します。
例としてfunctions.phpに下記を追記してみます。
function add_custom_roll() {
  add_role('custom_roll', 'カスタム権限グループ', [
    'read' => true,
  ]);
}
add_action('init', 'add_custom_roll');
これで「カスタム権限グループ」という名前の権限グループが作成できました。
権限としてはreadのみなので、WordPressで用意されている購読者(subscriber)と同じ権限になります。
次に投稿タイプがblogのカスタム投稿の権限を持たせるようにしてみます。
先に述べた通り、カスタム投稿に独自の権限を持たせる場合は設定が必要になります。
まずはカスタム投稿の記述にcapability_typeとmap_meta_capの設定を追加します。
function create_posttype() {
  register_post_type('blog',
    array(
      'label'           => 'ブログ',
      'public'          => true,
      'menu_position'   => 5,
      'hierarchical'    => false,
      'show_in_rest'    => true,
      'capability_type' => array(
        'blog', 'blogs'
      ),
      'map_meta_cap'    => true,
      'has_archive'     => true,
      'rewrite'         => array(
        'slug'          => 'blog',
        'with_front'    => false
      ),
      'query_var'       => false,
    )
  );
}
add_action('init', 'create_posttype');
上記のcapability_typeで設定したblogs(blogの複数形)の値を使って、権限グループの追加を行います。
function add_custom_roll2() {
  // カスタム投稿のcapability_typeで設定した投稿タイプの複数形
  $plural_post_type = 'blogs';

  add_role('custom_roll2', 'カスタム権限グループ2', [
    'read' => true, // 記事の閲覧
    'read_private_'.$plural_post_type => true, // 非公開記事の閲覧
    'edit_'.$plural_post_type => true, // カスタム投稿の記事編集
    'edit_others_'.$plural_post_type => true, // 他人の記事の編集
    'edit_private_'.$plural_post_type => true, // 非公開記事の編集
    'edit_published_'.$plural_post_type => true, // 公開記事の編集
    'delete_'.$plural_post_type => true, // 記事の削除
    'delete_others_'.$plural_post_type => true, // 他人の記事の削除
    'delete_private_'.$plural_post_type => true, // 非公開記事の削除
    'delete_published_'.$plural_post_type => true, // 公開記事の削除
    'publish_'.$plural_post_type => true, // 記事の公開
  ]);
}
add_action('init', 'add_custom_roll2');
これでカスタム投稿を管理する権限が付与できました。
add_role()の使用時の注意点として、add_role()の設定を行いページの読み込み(add_role()の実行)を行うと、設定した権限グループがデータベース上に追加されるようで、その後でその権限グループのadd_role()の削除や変更をしても適用(上書き)されないようでした。
前述の2つのadd_role()ではcustom_rollとcustom_roll2のように権限グループ名を別にして対応していますが、remove_role()で権限グループの削除をすることができるので、add_role()で設定する前にremove_role()で削除することでも適用することができます。
function add_custom_roll() {
  remove_role('custom_roll');

  // カスタム投稿のcapability_typeで設定した投稿タイプの複数形
  $plural_post_type = 'blogs';

  add_role('custom_roll', 'カスタム権限グループ', [
    'read' => true, // 記事の閲覧
    'read_private_'.$plural_post_type => true, // 非公開記事の閲覧
    'edit_'.$plural_post_type => true, // カスタム投稿の記事編集
    'edit_others_'.$plural_post_type => true, // 他人の記事の編集
    'edit_private_'.$plural_post_type => true, // 非公開記事の編集
    'edit_published_'.$plural_post_type => true, // 公開記事の編集
    'delete_'.$plural_post_type => true, // 記事の削除
    'delete_others_'.$plural_post_type => true, // 他人の記事の削除
    'delete_private_'.$plural_post_type => true, // 非公開記事の削除
    'delete_published_'.$plural_post_type => true, // 公開記事の削除
    'publish_'.$plural_post_type => true, // 記事の公開
  ]);
}
add_action('init', 'add_custom_roll');
これでadd_role()の変更内容が適用されました。
次に前述のカスタム投稿(blog)に紐づくカスタムタクソノミー(blog_cat)の権限を持たせるようにしてみます。
カスタム投稿と同様に、カスタムタクソノミーも独自の権限を持たせる場合は設定が必要になります。
まずは設定前の状態です。
  register_taxonomy('blog_cat', 'blog',
    array(
      'label'                 => 'カテゴリー',
      'public'                => true,
      'show_in_quick_edit'    => true,
      'show_admin_column'     => true,
      'description'           => 'ブログのカテゴリーです',
      'hierarchical'          => true,
      'rewrite'               => array(
        'slug'                => 'items',
        'with_front'          => false,
        'hierarchical'        => true,
      ),
    )
  );
capabilitiesの項目を追加します。
  register_taxonomy('blog_cat', 'blog',
    array(
      'label'                 => 'カテゴリー',
      'public'                => true,
      'show_in_quick_edit'    => true,
      'show_admin_column'     => true,
      'description'           => 'ブログのカテゴリーです',
      'hierarchical'          => true,
      'capabilities'          => array(
        'manage_terms'        => 'manage_blog_terms',
        'edit_terms'          => 'edit_blog_terms',
        'delete_terms'        => 'delete_blog_terms',
        'assign_terms'        => 'assign_blog_terms',
      ),
      'rewrite'               => array(
        'slug'                => 'items',
        'with_front'          => false,
        'hierarchical'        => true,
      ),
    )
  );
capabilitiesで設定した権限を、add_role()で追加します。
function add_custom_roll3() {
  // カスタム投稿のcapability_typeで設定した投稿タイプの複数形
  $plural_post_type = 'blogs';

  add_role('custom_roll3', 'カスタム権限グループ3', [
    'read' => true, // 記事の閲覧
    'read_private_'.$plural_post_type => true, // 非公開記事の閲覧
    'edit_'.$plural_post_type => true, // カスタム投稿の記事編集
    'edit_others_'.$plural_post_type => true, // 他人の記事の編集
    'edit_private_'.$plural_post_type => true, // 非公開記事の編集
    'edit_published_'.$plural_post_type => true, // 公開記事の編集
    'delete_'.$plural_post_type => true, // 記事の削除
    'delete_others_'.$plural_post_type => true, // 他人の記事の削除
    'delete_private_'.$plural_post_type => true, // 非公開記事の削除
    'delete_published_'.$plural_post_type => true, // 公開記事の削除
    'publish_'.$plural_post_type => true, // 記事の公開
    'manage_blog_terms' => true, // タームの管理
    'edit_blog_terms' => true, // タームの編集
    'delete_blog_terms' => true, // タームの削除
    'assign_blog_terms' => true, // タームの割り当て
  ]);
}
add_action('init', 'add_custom_roll3');
これでカスタムタクソノミーを管理する権限も付与できました。
権限グループの編集
既存の権限グループの権限内容を変更してみます。
寄稿者(contributor)は記事を作成する権限を持っていますが、メディア(ファイルのアップロード)の権限を持っていないため、メディアの権限を追加してみます。
function edit_roll() {
  $role = get_role('contributor');
  if($role) {
    $role->add_cap('upload_files');
  }
}
add_action('admin_init', 'edit_roll');
これで寄稿者のロールでメディアを使用することができるようになりました。
add_role()の時と同じく、適用された後にコードを削除しても権限は変更されないようなので、設定の際は注意してください。
削除の際はremove_cap()を使用します。
function edit_roll() {
  $role = get_role('contributor');
  if($role) {
    $role->remove_cap('upload_files');
  }
}
add_action('admin_init', 'edit_roll');
コメントが承認されるまで時間がかかります。