Astroはドキュメントサイトやブログなどといった、コンテンツ閲覧がメインのWebサイトの構築に適したフレームワークで、ビルド時に不要なJavaScriptを省いてサイトの高速化を図るといった特徴があります。
今回はAstroのインストールと、コードはどういった内容なのかを簡単に触ってみます。
インストール
まずはプロジェクトを作成します。
使用するAstroのバージョンは記事作成時点で最新のv3.2.2で、Node.jsはv18.14.1以上である必要があります。
プロジェクトを作成するディレクトリへ移動して、下記コマンドを実行します。
npm create astro@latest
プロジェクト名やTypeScriptの使用などいくつか聞かれるので回答します。
今回は全て初期値のまま進めました。
   dir   Where should we create your new project?
         ./curved-crater

  tmpl   How would you like to start your new project?
         ● Include sample files (recommended)
         ○ Use blog template
         ○ Empty

  deps   Install dependencies? (recommended)
         ● Yes  ○ No

    ts   Do you plan to write TypeScript?
         ● Yes  ○ No

   use   How strict should TypeScript be?
         ● Strict (recommended)
         ○ Strictest
         ○ Relaxed

   git   Initialize a new git repository? (optional)
         ● Yes  ○ No

  next   Liftoff confirmed. Explore your project!

         Enter your project directory using cd ./curved-crater
         Run npm run dev to start the dev server. CTRL+C to stop.
         Add frameworks like react or tailwind using astro add.

         Stuck? Join us at https://astro.build/chat

╭─────╮  Houston:
│ ◠ ◡ ◠  Good luck out there, astronaut!
╰─────╯
プロジェクトの作成完了後、プロジェクトに移動して開発サーバを起動します。
npm run dev
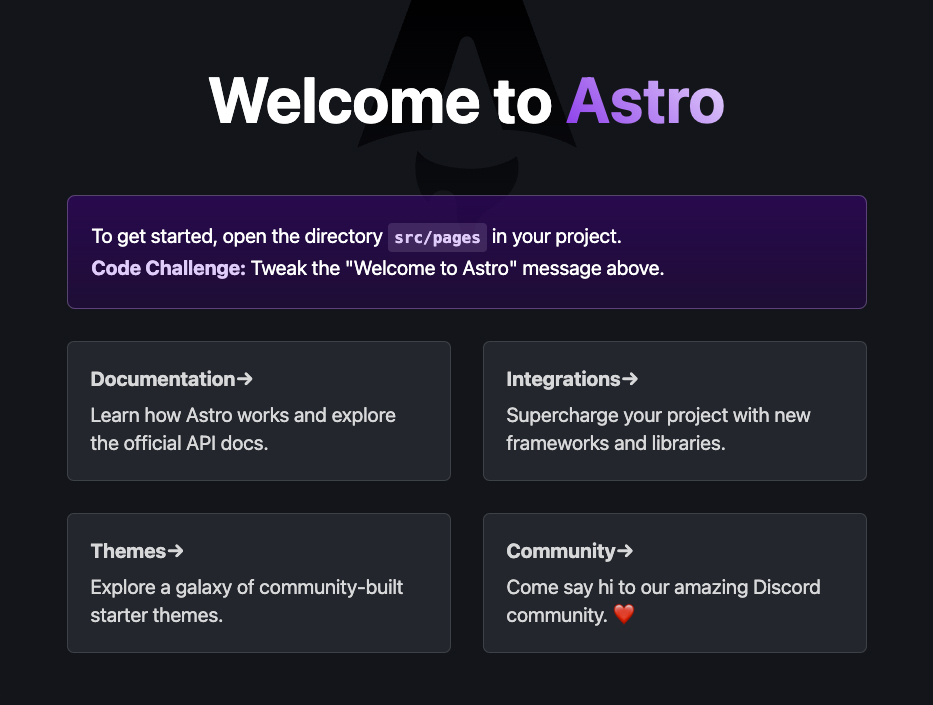
http://localhost:4321/ にアクセスして表示されればOKです。
構造・中身
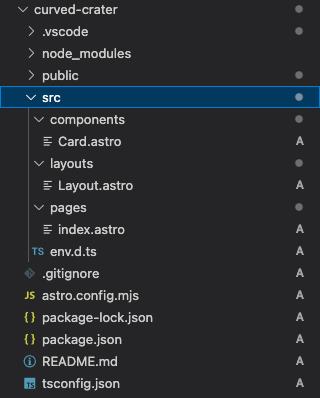
ディレクトリ構造は以下のようになっています。
- public
- src
- components
- Card.astro
- layouts
- Layout.astro
- pages
- index.astro
- env.d.ts
- components
- astro.config.mjs
- package.json
- tsconfig.json
astro.config.mjsはAstroの設定ファイルで、中身は以下のようになっています。
import { defineConfig } from 'astro/config';

// https://astro.build/config
export default defineConfig({});
開発で使用するファイルは主にsrcディレクトリ内で、開発サーバ起動時に表示されたページは /src/pages/index.astro になります。
中身は以下のようになっています。
---
import Layout from '../layouts/Layout.astro';
import Card from '../components/Card.astro';
---
<Layout title="Welcome to Astro.">
<main>
<svg
class="astro-a"
width="495"
height="623"
viewBox="0 0 495 623"
fill="none"
xmlns="http://www.w3.org/2000/svg"
aria-hidden="true"
>
<path
fill-rule="evenodd"
clip-rule="evenodd"
d="M167.19 364.254C83.4786 364.254 0 404.819 0 404.819C0 404.819 141.781 19.4876 142.087 18.7291C146.434 7.33701 153.027 0 162.289 0H332.441C341.703 0 348.574 7.33701 352.643 18.7291C352.92 19.5022 494.716 404.819 494.716 404.819C494.716 404.819 426.67 364.254 327.525 364.254L264.41 169.408C262.047 159.985 255.147 153.581 247.358 153.581C239.569 153.581 232.669 159.985 230.306 169.408L167.19 364.254ZM160.869 530.172C160.877 530.18 160.885 530.187 160.894 530.195L160.867 530.181C160.868 530.178 160.868 530.175 160.869 530.172ZM136.218 411.348C124.476 450.467 132.698 504.458 160.869 530.172C160.997 529.696 161.125 529.242 161.248 528.804C161.502 527.907 161.737 527.073 161.917 526.233C165.446 509.895 178.754 499.52 195.577 500.01C211.969 500.487 220.67 508.765 223.202 527.254C224.141 534.12 224.23 541.131 224.319 548.105C224.328 548.834 224.337 549.563 224.347 550.291C224.563 566.098 228.657 580.707 237.264 593.914C245.413 606.426 256.108 615.943 270.749 622.478C270.593 621.952 270.463 621.508 270.35 621.126C270.045 620.086 269.872 619.499 269.685 618.911C258.909 585.935 266.668 563.266 295.344 543.933C298.254 541.971 301.187 540.041 304.12 538.112C310.591 533.854 317.059 529.599 323.279 525.007C345.88 508.329 360.09 486.327 363.431 457.844C364.805 446.148 363.781 434.657 359.848 423.275C358.176 424.287 356.587 425.295 355.042 426.275C351.744 428.366 348.647 430.33 345.382 431.934C303.466 452.507 259.152 455.053 214.03 448.245C184.802 443.834 156.584 436.019 136.218 411.348Z"
fill="url(#paint0_linear_1805_24383)"></path>
<defs>
<linearGradient
id="paint0_linear_1805_24383"
x1="247.358"
y1="0"
x2="247.358"
y2="622.479"
gradientUnits="userSpaceOnUse"
>
<stop stop-opacity="0.9"></stop>
<stop offset="1" stop-opacity="0.2"></stop>
</linearGradient>
</defs>
</svg>
<h1>Welcome to <span class="text-gradient">Astro</span></h1>
<p class="instructions">
To get started, open the directory <code>src/pages</code> in your project.<br />
<strong>Code Challenge:</strong> Tweak the "Welcome to Astro" message above.
</p>
<ul role="list" class="link-card-grid">
<Card
href="https://docs.astro.build/"
title="Documentation"
body="Learn how Astro works and explore the official API docs."
/>
<Card
href="https://astro.build/integrations/"
title="Integrations"
body="Supercharge your project with new frameworks and libraries."
/>
<Card
href="https://astro.build/themes/"
title="Themes"
body="Explore a galaxy of community-built starter themes."
/>
<Card
href="https://astro.build/chat/"
title="Community"
body="Come say hi to our amazing Discord community. ❤️"
/>
</ul>
</main>
</Layout>
<style>
main {
margin: auto;
padding: 1rem;
width: 800px;
max-width: calc(100% - 2rem);
color: white;
font-size: 20px;
line-height: 1.6;
}
.astro-a {
position: absolute;
top: -32px;
left: 50%;
transform: translatex(-50%);
width: 220px;
height: auto;
z-index: -1;
}
h1 {
font-size: 4rem;
font-weight: 700;
line-height: 1;
text-align: center;
margin-bottom: 1em;
}
.text-gradient {
background-image: var(--accent-gradient);
-webkit-background-clip: text;
-webkit-text-fill-color: transparent;
background-size: 400%;
background-position: 0%;
}
.instructions {
margin-bottom: 2rem;
border: 1px solid rgba(var(--accent-light), 25%);
background: linear-gradient(rgba(var(--accent-dark), 66%), rgba(var(--accent-dark), 33%));
padding: 1.5rem;
border-radius: 8px;
}
.instructions code {
font-size: 0.8em;
font-weight: bold;
background: rgba(var(--accent-light), 12%);
color: rgb(var(--accent-light));
border-radius: 4px;
padding: 0.3em 0.4em;
}
.instructions strong {
color: rgb(var(--accent-light));
}
.link-card-grid {
display: grid;
grid-template-columns: repeat(auto-fit, minmax(24ch, 1fr));
gap: 2rem;
padding: 0;
}
</style>
2〜3行目でインポートしているコンポーネントを見てみます。
まず /src/layouts/Layout.astro ですが、これは名前の通りページ全体のレイアウト部分になります。
---
interface Props {
	title: string;
}

const { title } = Astro.props;
---

<!doctype html>
<html lang="en">
	<head>
		<meta charset="UTF-8" />
		<meta name="description" content="Astro description" />
		<meta name="viewport" content="width=device-width" />
		<link rel="icon" type="image/svg+xml" href="/favicon.svg" />
		<meta name="generator" content={Astro.generator} />
		<title>{title}</title>
	</head>
	<body>
		<slot />
	</body>
</html>
<style is:global>
	:root {
		--accent: 136, 58, 234;
		--accent-light: 224, 204, 250;
		--accent-dark: 49, 10, 101;
		--accent-gradient: linear-gradient(
			45deg,
			rgb(var(--accent)),
			rgb(var(--accent-light)) 30%,
			white 60%
		);
	}
	html {
		font-family: system-ui, sans-serif;
		background: #13151a;
		background-size: 224px;
	}
	code {
		font-family:
			Menlo,
			Monaco,
			Lucida Console,
			Liberation Mono,
			DejaVu Sans Mono,
			Bitstream Vera Sans Mono,
			Courier New,
			monospace;
	}
</style>
コンポーネントはpropsで値を受け取ることができます。
Layout.astroの場合、titleが定義されています。
次に /src/components/Card.astro ですが、これはカード型レイアウトのコンポーネントになります。
---
interface Props {
title: string;
body: string;
href: string;
}
const { href, title, body } = Astro.props;
---
<li class="link-card">
<a href={href}>
<h2>
{title}
<span>→</span>
</h2>
<p>
{body}
</p>
</a>
</li>
<style>
.link-card {
list-style: none;
display: flex;
padding: 1px;
background-color: #23262d;
background-image: none;
background-size: 400%;
border-radius: 7px;
background-position: 100%;
transition: background-position 0.6s cubic-bezier(0.22, 1, 0.36, 1);
box-shadow: inset 0 0 0 1px rgba(255, 255, 255, 0.1);
}
.link-card > a {
width: 100%;
text-decoration: none;
line-height: 1.4;
padding: calc(1.5rem - 1px);
border-radius: 8px;
color: white;
background-color: #23262d;
opacity: 0.8;
}
h2 {
margin: 0;
font-size: 1.25rem;
transition: color 0.6s cubic-bezier(0.22, 1, 0.36, 1);
}
p {
margin-top: 0.5rem;
margin-bottom: 0;
}
.link-card:is(:hover, :focus-within) {
background-position: 0;
background-image: var(--accent-gradient);
}
.link-card:is(:hover, :focus-within) h2 {
color: rgb(var(--accent-light));
}
</style>
最後にページの追加を試してみます。
/src/pages/ 内にsampleディレクトリを作成して、下記のファイル内容で index.astro を追加します。
---
import Layout from '../../layouts/Layout.astro';
---

<Layout title="sample page">
	<main>
		<h1>サンプルページ</h1>
		<p>ページ追加のサンプルです。</p>
	</main>
</Layout>

<style>
	h1 {
		color: white;
		font-size: 32px;
		text-align: center;
	}
	p {
		color: white;
		text-align: center;
	}
</style>
これで http://localhost:4321/sample/ にページを追加できました。

ビルド
下記コマンドでビルドを実行でき、distディレクトリに出力されます。
npm run build
ビルド結果は下記コマンドでプレビューできます。
npm run preview
コメントが承認されるまで時間がかかります。